
When your pet gets injured or falls ill, the difference between life and death can depend on how quickly you act. While pet emergencies can be frightening, knowing basic first aid skills gives you confidence and ensures you can provide immediate care before professional help arrives. This guide covers everything—from assembling your kit to recognizing emergencies and performing CPR—with clear instructions and image placement ideas to aid comprehension.
1. Introduction: The Importance of Pet First Aid
Unexpected situations—like cuts, heatstroke, or swallowing toxic substances—can happen anytime, anywhere. As pet parents, our first reaction is to comfort and protect our companions. But comfort is not always enough. By learning basic first aid, you can:
- Provide immediate care: Control bleeding, relieve pain, and prevent worsening injuries.
- Stabilize your pet: Keep them calm, warm or cool, and preserve vital signs.
- Buy time: Ensure your pet reaches a vet in the best possible condition.
- Support recovery: Offer better post-care, reduce infection risk, and improve outcomes.
Your first aid readiness checklist:
| Task | ✅ |
|---|---|
| Assembled a pet-only first aid kit | |
| Learned how to take temperature, pulse, respiration | |
| Practiced pressure bandaging and CPR | |
| Memorized emergency hotlines | |
| Talked to vet about first aid plans |
First Aid Tip: Keep a laminated checklist inside your kit, along with vet and poison hotline numbers. Clear, memorable steps can make all the difference under stress.

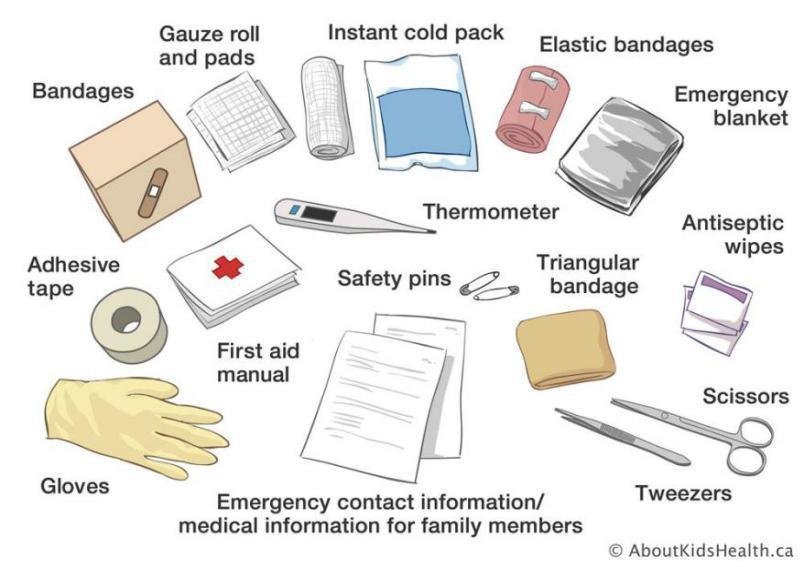
2. Building the Ultimate Pet First Aid Kit
Compiling a well-stocked first aid kit gives you immediate response options. Keep your kit in a sturdy, water-resistant case and store it in an easily accessible, but pet-inaccessible, location. Replace expired items regularly.
Essential Components:
- Gauze pads and rolls (2″ & 4″)
- Self-adhering vet wrap
- Non-stick wound pads
- Adhesive tape
- Antiseptic wipes (chlorhexidine or povidone-iodine)
- Sterile saline solution
- Styptic powder (for nail bleeding)
- Digital thermometer (rectal) + lubricant
- Muzzle or soft fabric (only if desperate, keep pet calm)
- Tweezers or tick remover
- Rubber gloves
- Scissors (blunt-tipped)
- Instant cold pack
Optional Tools:
- Thermometer covers
- Syringes (no needle)
- Emergency blanket or towel
- Pet booties
- Disposable plastic syringe (for flushing wounds)
- Vet-approved analgesics (only if prescribed)
Pro Tip: Customize for your pet’s needs. Cats may benefit from a latex exam glove muzzle, while large dogs need heavy-duty gauze.
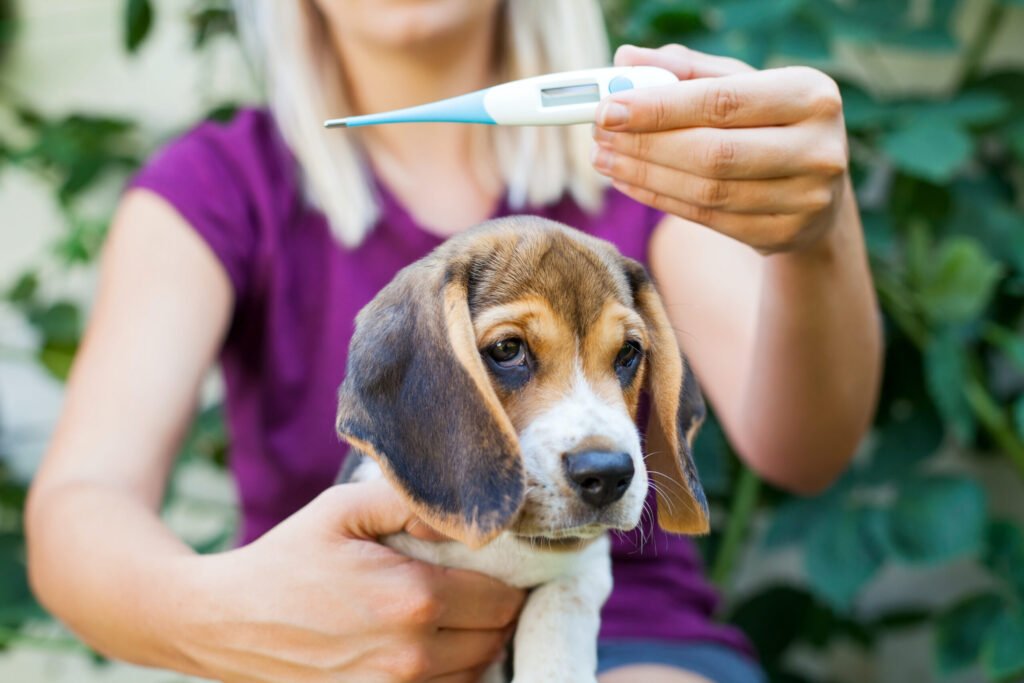
3. Checking Vital Signs: Temperature, Pulse, and Respiration
3.1 “The Big Three” – What They Tell You
- Respiration rate: Normal resting rate is 10–30 breaths/min (dogs), ~20–30 (cats). Count chest rises over 15 seconds × 4.
- Pulse/heart rate: 60–140 bpm (dogs, depending on size/activity), 140–220 bpm (cats). Feel at inner thigh artery or behind elbow.
- Rectal temperature: Normal range 38.1–39.2°C (100.5–102.5°F). Above or below indicates fever or hypothermia.
3.2 How-To Instructions
- Respiration: Calmly observe side-view. Count chest lifts.
- Pulse: Feel with flat fingers (not thumb), count beats per 15s × 4.
- Temperature:
- Lubricate thermometer.
- Insert 1–2 cm into rectum.
- Hold 30–60 sec until beep.
- Read temperature calmly and remove.
3.3 Interpreting Results
Stay within these normal ranges:
- Pulse:
- Toy dogs: 100–140 bpm
- Med/Large dogs: 60–100 bpm
- Cats: 140–220 bpm
- Respiration:
- Dogs: 10–30 breaths/min
- Cats: 20–30 breaths/min
Deviations require action—fever, slow breathing, weak pulse, heavy panting, or fast breathing all need monitoring and potential vet care.
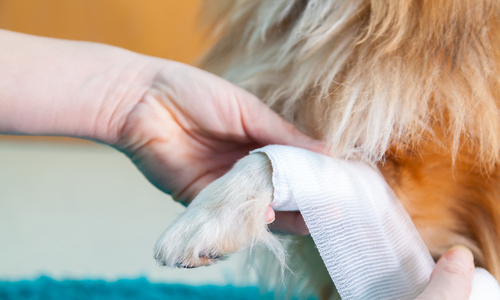
4. Controlling Bleeding and Treating Wounds
4.1 Step-by-Step Bleeding Control
- Apply pressure using sterile gauze directly to the site.
- If bleeding seeps through, don’t remove the dressing—add layers.
- After 5–10 minutes of firm pressure, if bleeding stops, clean the wound.
- Secure a pressure bandage with vet wrap or tape.
- If bleeding continues heavily, head to vet immediately.
4.2 Proper Wound Care
- Trim hair around the wound for visibility.
- Clean gently using saline or diluted antiseptic (0.05%).
- Apply non-stick dressing, then gauze, then secure wrap.
- Change dressing daily, monitor for redness, pus, swelling.
- Use styptic powder if bleeding from nail trimmings.
4.3 Recognizing Infection
Signs to watch for:
- Redness or warmth
- Pus (yellow/green)
- Swelling
- Foul odor
- Pain or limping
- Fever, lethargy
If infected, clean daily and get veterinary medication.
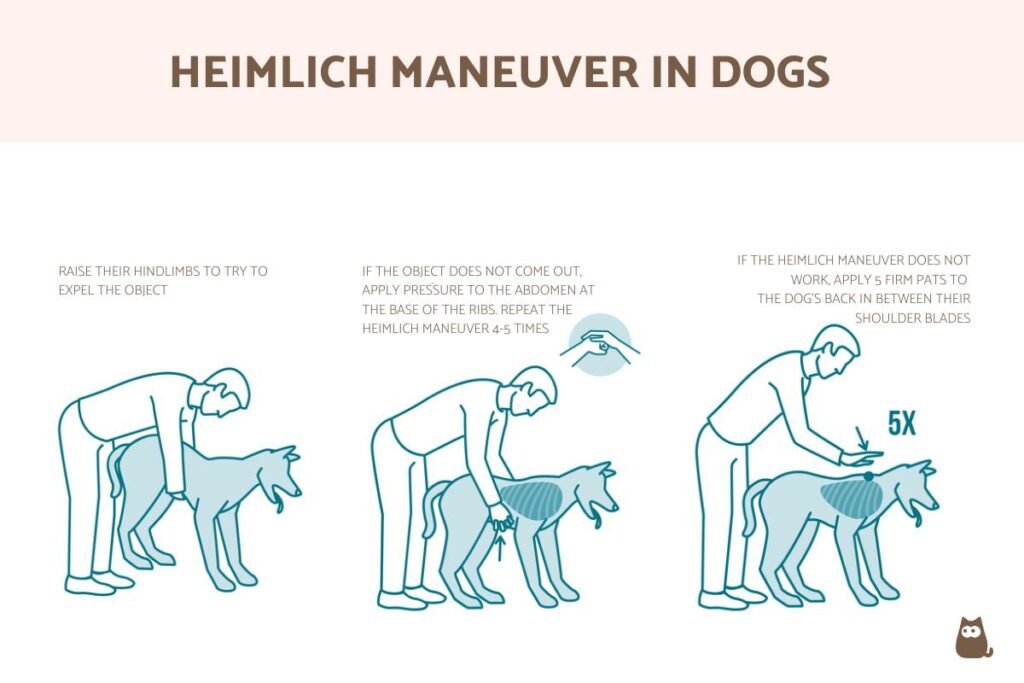
5. Choking & Airway Obstruction
5.1 Spotting Signs
- Gagging, pawing at face
- Retching but no vomit
- Panicked expression, blue lips
- Loss of consciousness (severe cases)
5.2 First Aid Protocol
Dogs:
- Gently open mouth and sweep object if visible.
- Use Heimlich maneuver:
- Small dogs: hold upside-down and thump back.
- Large dogs: stand behind, thumbs into abdomen, push quickly upward/back.
Cats:
- Hold belly-up, give 5 firm back blows, watch for dislodged item.
- Use finger sweep if visible.
After the object is removed: reassure, watch for signs of throat injury or respiratory distress, and consider vet check for airway damage.
6. Burns and Hot Surface Injuries
6.1 Classifying Burns
- First-degree: Red, minor pain (sunburn).
- Second-degree: Blisters, raw areas.
- Third-degree: Charred tissue, severe damage.
6.2 Immediate Response
- Cool with running water for 5–10 minutes (never ice directly).
- Cover with clean gauze—no ointments or oils.
- For blistering or big burns, seek vet care immediately.
6.3 Preventing Burns
- Place non-slip mats on hot surfaces.
- Test surfaces before allowing pet near heaters.
- Avoid hot pavement walking barefoot for dogs.

7. Poisoning & Toxic Ingestion
7.1 Toxic Common Items:
- Foods: chocolate, grapes/raisins, xylitol, garlic, onions
- Meds: human painkillers, antidepressants
- Plants: lilies, sago palm, tulips, dieffenbachia
- Chemicals: antifreeze, cleaning solvents, pesticides
7.2 Recognizing Poisoning
- Vomiting, drooling, abdominal pain
- Weakness, tremors, seizures
- Collapse, tremors or heavy breathing
7.3 What You Can Do
- Identify the cause: the item and ingestion time.
- Call Vet or Pet Poison Helpline (records symptoms, time frame).
- Follow expert advice—do not induce vomiting unless directed.
- Monitor vitals: temperature, pulse, respiration.
- Transport immediately if symptoms worsen.
Pre-order your Poison Helpline cards and keep them by phone and in kit.

8. Heatstroke and Hypothermia
8.1 Heatstroke – Watch for:
- Heavy panting, drooling, glossy eyes
- Elevated temperature (>40°C / 104°F)
- Weakness, vomiting, collapse, seizures
First Aid:
- Move to shady, cool area.
- Slowly apply cool water—avoid cold directly.
- Give small water sips when stabilized.
- Contact your vet—rapid drops can cause shock.
Prevent Heatstroke:
- Exercise early morning/evening
- Provide shade and fresh water
- Never leave pets in parked cars
8.2 Hypothermia – Signs:
- Shivering, stiffness
- Slow pulse or breathing
- Cold ears/paws
First Aid:
- Move to warmth: blanket, close car vent.
- Warm with body heat or lukewarm water.
- Once warmed, get check-up for internal issues.
9. Fractures, Sprains & Transport
9.1 Identifying Injuries
- Limping, unwilling to put weight
- Swelling, deformity, or unusual angles
- Whining when touched
9.2 First Aid Approach
- Limit movement. Canine companion should be carried.
- Create a splint or board with gentle padding.
- Transport in a sturdy crate or board.
9.3 While En Route
- Keep pet calm and secure.
- Observe breathing and responsiveness.
- Take pet to a vet—even closed fractures require attention.
10. CPR: When and How
10.1 When is CPR Needed?
- No breathing or pulse
- Collapse after choking or trauma
10.2 CPR Method
- Place dog on right side; cat in stretched position
- Chest compressions:
- Medium to large dog: 5 fingers above front elbow
- Compress 1/3–1/2 chest depth at 100–120 per minute
- Rescue breathing: 2 breaths every 30 compressions (cover pet mouth or seal nostrils in cats)
10.3 Safety Tips
- Use waterproof coat or barrier
- Pause after 2 min to recheck pulse/breathing
- Continue until vet arrives or pet shows signs
Important: Always let a trained professional assess afterward—even if successful.
11. When to Rush to the Vet
Even well-applied first aid may not suffice. Seek immediate veterinary care if your pet:
- Collapses or is unconscious
- Can’t breathe
- Has uncontrolled bleeding
- Exhibits seizures
- Is hit by a vehicle or dropped from height
- Ingested toxin and symptoms appear
What to share with vet:
- Pet’s age, weight, breed
- First aid steps taken
- Quantity and timing of ingestion or injury
- Observed symptoms and vitals
Prep your phone with vet contact, emergency clinics, poison helpline, and pre-charge your car’s directions.
12. Aftercare & Monitoring
Once home from emergency care:
- Medmanagement: follow dose and schedule strictly
- Dressings: keep clean and dry, replace daily
- Observation: watch for complications (infection, appetite changes)
- Create healing space: quiet, padded rest area
- Exercise plan: follow recommended limitations
- Follow-up: recheck appointments, stitch removal, imaging
Recovery takes compassion—your care makes all the difference.
13. Bonus Resources
- Downloadable PDFs:
- Pet First Aid Kit checklist
- Emergency contact card
- Video tutorials:
- CPR step-by-step for dogs
- Heimlich technique demos
- Recommended reading:
- “The Complete Guide to Pet Emergency Care” by Dr. Blum
- Your vet’s local first aid info
14. Conclusion
Emergencies happen—being prepared, calm, and equipped can dramatically improve outcomes. With knowledge of first aid methods, you act fast, ease suffering, and offer your pet the loving care they deserve. Build your kit, practice occasionally, and stay alert. Safety and preparedness are expressions of love.